If you don’t mind about the story behind this, you can scroll down to the section with command lines!

Introduction

I bought a Mac Mini machine in 2006. It was equipped with a Core Duo processor at 1.66 GHz, 512 MB of RAM, a 60 GB hard drive, and an Intel 945GM GPU chipset. This machine could be upgraded (not easily, but that was still possible, except for the GPU chipset), so over time, it got:

  • an Intel Core 2 Duo T7600 processor (the most capable CPU compatible with the motherboard)
  • 2 RAM modules of 2GB
  • a 64GB SSD

I did not upgrade the operating system (Mac OS 10.4 “Tiger”); instead I installed Ubuntu quite soon. At first, it was ubuntu version 6.06 (codename “The Dapper Drake”), and of course I upgraded it over time. And guess what? I am still using this computer, at home. It boots fast, it is still quiet, and it works really well for what I do with it: mostly internet browsing, and for the times when I work from home, software development.

The main limitation of this old machine is the fact it cannot support a 64-bit operating system. Even if the upgraded processor has a 64-bit instruction set, the rest of the system cannot support it. And nowadays, it starts to complicate things a little.

Another limitation due to the motherboard is the fact it cannot handle this amount of RAM. The operating system reports 3G instead of 4G. However, 32-bit operating systems consume less memory, so 3G is still very acceptable for my usage.

About Ubuntu OS versions and upgrades

Every 2 years, Canonical company releases a new Ubuntu LTS version (Long-Term-Support). These LTS versions are supported for 5 years. At the time of this writing, latest LTS version is Ubuntu 18.04 (as one may guess, “18.04” means “april 2018”), and next one will be released soon (version “20.04”).

Canonical company releases other versions every 6 months, but these are not supported for a long time, so using them requires to upgrade every 6 months to continue getting security updates.

Obviously, the OS allows to upgrade itself without having to reinstall the machine from scratch. However, upgrading such an old machine may lead to problems: probably nobody (except me!) tests the newest OS versions on such an old machine…

In order to test a version before actually performing the upgrade, one may download the iso image of the new version, and use it in “live mode”: run the OS from the USB device, without installing it. But since Ubuntu 18.04, Canonical no longer provides 32-bit iso images.

When the problem arose

In early may 2018, when the new LTS version was just released, I decided to upgrade my mac mini. At this time, it was installed with previous LTS, 16.04. The upgrade process went well, but after restart, I got some issues related to GPU handling. First, there was a very long delay on boot; that could be fixed just by adding a kernel parameter. Secondly, the GPU driver was apparently not correctly loaded. When showing the “Details” menu entry of the parameters window, the GPU driver displayed was “llvmpipe”. This means that software rendering was enabled, as a fallback. The “llvmpipe” software rendering stack is probably very capable on a new machine, but when using a CPU of 2007, software rendering is obviously not a good solution: the windowing system appeared much slower than before.

I looked at various forum posts but could not fix this issue. So I finally decided to re-install ubuntu 16.04. With 5-years support and security updates, I could still use this mac mini up to april 2021, which was still remarkable.

And now…

Recently, a forum post led me to think my problem might be fixed by a recent update in “mesa” GPU handling library. Two or three months ago, this was integrated into Ubuntu 18.04 package updates. Then, my goal was to retest this updated version. But, if ever it failed again, I would have to reinstall the machine again with version 16.04, from scratch! So I needed a way to test this updated version without installing it on the machine. In other words, I needed a “live” version of Ubuntu 18.04. And, since Canonical no longer provides 32-bit versions of iso images, I decided to build my own 32-bit Ubuntu 18.04 live OS, as shown below.

Building a 32-bit Ubuntu 18.04 live OS, my way

You will need a quiet large amount of free space: around 10 gigabytes. You can run this procedure on a 32-bit or 64-bit Ubuntu computer.

First, let’s create a chroot environment containing a minimal operating system base:

$ MIRROR=http://ch.archive.ubuntu.com/ubuntu/
$ debootstrap --arch i386 --variant minbase bionic bionic-i386 $MIRROR

Notes:

  • debootstrap is the very classical command to build such a chroot environment.
  • bionic is the codename for Ubuntu 18.04.
  • --arch i386 allows us to indicate we target a 32-bit architecture.
  • --variant minbase allows us to specify we want a minimal environment at this step.
  • bionic-i386 is the name I gave to the output directory generated.

The reason we chose variant minbase is that debootstrap is not as smart as a real package manager, so if one tries to solve complex dependencies at this step (by chosing another variant, and using option --include to select more packages to be installed), it will probably fail.

Before entering this chroot environment, let’s make sure /proc, /dev, /sys or /dev/pts will be available, otherwise some commands may fail.

$ mount -o bind /proc bionic-i386/proc
$ mount -o bind /sys bionic-i386/sys
$ mount -o bind /dev bionic-i386/dev
$ mount -o bind /dev/pts bionic-i386/dev/pts

Then we are ready to enter the chroot environment:

$ chroot bionic-i386
[chroot]#

First let us install a text editor and the locales package. Setting up a correct locale will allow us to clear many verbose warnings in the following commands.

[chroot]# apt update && apt install vim locales
[chroot]# vi /etc/locale.gen    # uncomment the locale you want, mine is fr_FR.UTF-8
[chroot]# locale-gen
Generating locales (this might take a while)...
  fr_FR.UTF-8... done
Generation complete.
[chroot]# echo LANG=fr_FR.UTF-8 >> /etc/default/locale
[chroot]#

Next, we shall modify the configuration of source repositories, to allow security updates, regular updates, and restricted repository section.

[chroot]# cat << EOF > /etc/apt/sources.list
deb http://ch.archive.ubuntu.com/ubuntu bionic main restricted
deb http://ch.archive.ubuntu.com/ubuntu bionic-updates main restricted
deb http://security.ubuntu.com/ubuntu bionic-security main restricted
EOF
[chroot]#

We can now upgrade the whole OS to latest package versions:

[chroot]# apt update && apt upgrade
[chroot]#

Now, we need to turn this minimal environment (minbase) into a much more complete OS:

  • we want the default graphical desktop (package ubuntu-desktop)
  • we need proper network management (this is mostly ready after installation of ubuntu-desktop, but we need to add package netplan.io for proper network setup on boot)
  • while we are at selecting packages, we can add some more that will be needed later in this process: linux-image-generic for the linux kernel, and lvm2 (logical volume management). (Anyway, if we omit these packages at this step, the image construction tool we will use later would add them automatically.)
[chroot]# apt install netplan.io ubuntu-desktop lvm2 linux-image-generic
[chroot]#

Note: when the package manager warns about the fact grub will not be installed on any device, you can safely answer that this is not a problem.

Apparently, the default configuration for netplan networking tool is not installed with its package. So let’s create this configuration file (I took the one of another system already installed).

[chroot]# cat << EOF > /etc/netplan/01-network-manager-all.yaml
# Let NetworkManager manage all devices on this system
network:
  version: 2
  renderer: NetworkManager
EOF
[chroot]#

We can also define a root password now:

[chroot]# passwd

And we are done with system customization:

[chroot]# exit
$ umount /dev/pts /dev /sys /proc

One last thing: the DNS configuration that was working on this build machine may not work on the target machine we want to bootup. So let’s remove it. The target OS should find its config alone.

$ rm bionic-i386/etc/resolv.conf

To turn the chroot environment into an image that can be flashed on a USB device, we can use a tool I developed called debootstick. It is available in Ubuntu (repository section universe) and Debian, but if you want support for newest operating system versions, you may prefer to install it from the github repository.

$ debootstick --config-kernel-bootargs "+console=ttyS0" bionic-i386 bionic.dd

Notes:

  • --config-kernel-bootargs "+console=ttyS0" is optional, it allows to ease debugging at next step (see below).
  • Generated file bionic.dd is our generated USB image. It is quite large (3.4G). This is because debootstick does not create compressed images like standard Ubuntu iso images. Instead, the OS is “installed” inside the USB image the same as it would be installed on the target disk. Thanks to this design choice, linux kernel or bootloader package updates work fine, whereas they fail on official images. This makes debootstick-generated images usable on the long term. Check this for more info.

Before dumping the image to a USB device, we can test it with kvm:

$ cp bionic.dd bionic-test.dd
$ truncate -s 16G bionic-test.dd    # simulate a copy on a larger drive
$ kvm -drive file=bionic-test.dd,media=disk,index=0,format=raw -m 4G -serial mon:stdio \
      -device virtio-net-pci,netdev=user.0 -netdev user,id=user.0

Notes (more info here):

  • I ran this on a powerful computer.
  • I allocated 4G RAM for this virtual machine.
  • -serial mon:stdio allows to get a command line shell (multiplexed with qemu monitor), useful in case of problems.
  • The remaining options allow the virtual machine to get internet connectivity.

The virtual machine should run well. You should get first login configuration screens: user name and password, time zone, etc. Once logged into the graphical session, you can observe that the GPU driver is “llvmpipe” (software rendering). This is because kvm does not provide proper 3D GPU emulation in this configuration. But if the host CPU is powerful enough, the desktop can still be quite reactive.

We can now dump the image to our USB device:

$ dmesg -w      # then, plug in your USB device, to be sure about its name /dev/sd<X>
[...]
^C
$ dd if=bionic.dd of=/dev/sd<X> bs=10M conv=fsync

And, finally, reboot the target machine with it!

Conclusion

Thanks to this 32-bit live USB image, I could verify that this updated version of Ubuntu 18.04 would work fine on my mac mini. The parameters window was displaying the expected GPU driver (‘Intel 945GM’ instead of ‘llvmpipe’ as before). Therefore I knew I could safely start the upgrade procedure. The upgrade went well and I found no issues since the upgrade. My old mac mini is as reactive as before. With security updates for this version ending on april 2023, I suppose this old computer from 2006 can probably work very well up to this time! (or later, if 20.04 version works as well…)

If you are interested, be aware that debootstick can generate images for a raspberry pi, and it can also work with other tools (e.g. docker instead of debootstrap). For instance this example shows how easily you can turn a docker image into a bootable image for a raspberry pi.
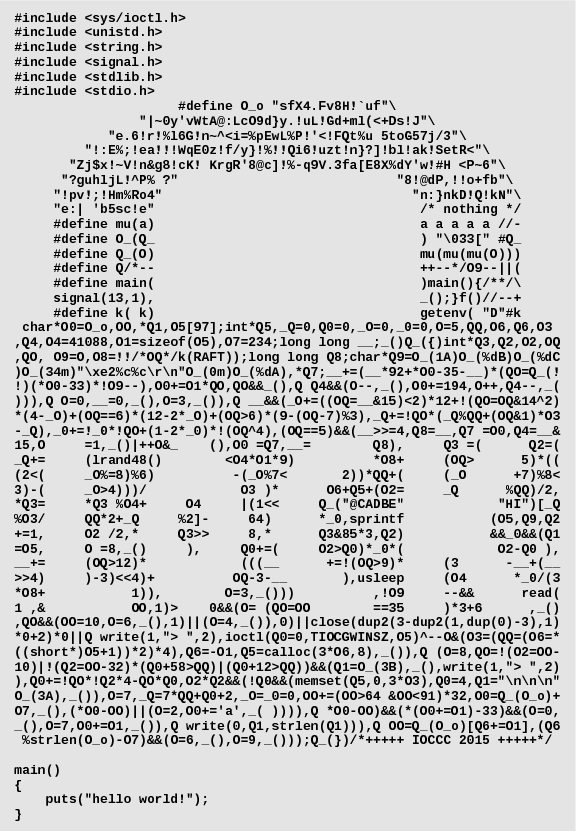
Those of you who follow the The International Obfuscated C Code Contest (IOCCC) may have noticed I got a winning entry this year.

For now, only the list of winners is published. There will be a review phase between winners before programs are published.

I actually proposed two programs, but only one made it. I will probably improve the other one for the next IOCCC contest.

Nevertheless this is my second winning entry since I got a first one in 2015. You can get more info about it here, and, if you can read french, you can get even more interesting details.

I have been working for the WalT project for more than 6 years now. One of the most tricky tasks about it concerns netboot on Raspberry Pi boards. This morning, I discovered yet another interesting detail, and I decided to share my experience about this topic.

U-boot

U-boot is a network bootloader that can be used to boot Raspberry Pi boards over a network. Whilst early Raspberry Pi compatible versions were quite buggy (we first used this in 2012), it is now a reliable solution.

2-stages booting procedure, for easier maintenance

In WalT, we have a two-stages booting procedure, with one first u-boot script embedded on the SD-card, and a second one (see this file, after the SCRIPT_START tag) embedded in each WalT operating system image. In a more standard setup, you would put this second script on the server, inside the TFTP directory. And as you may guess, the first script retrieves the second one (through TFTP) and executes it.

When you want to handle several dozens of nodes, such a two step procedure can greatly reduce maintenance: the first script is very simple, so nearly all maintenance tasks that could occur concern the second one. As a result, you can modify the bootup procedure of all nodes at once, by editing this second script, on the server.

Device identification

In the first boot script, you can however notice something interesting:

  1. we compute the raspberry model we are currently running on
  2. we set a variable bootp_vci accordingly

VCI stands for “vendor-class-identifier”. U-boot will set the VCI field of the DHCP request accordingly. On the remote end, the DHCP server (isc-dhcpd in our case) can take this value into account in order to point the node to a compatible kernel version (cf. Raspbian’s kernel7.img file for raspberry pi 2 & 3, and kernel.img for earlier models).

Preserving firmware-provided kernel arguments

This is the tricky part. With a standard Raspbian setup, the raspberry pi firmware loads linux kernel directly (file kernel.img or kernel7.img on the SD-card). In our case, the firmare loads u-boot (compiled as file kernel.img or kernel7.img), and u-boot loads the kernel.

The Raspbian linux kernel is not standard (the repository is here). Because of this, it should be started with device-specific kernel arguments, specifying things such as the position of the DMA range in RAM. Those device-specific kernel arguments are given by the firmware to the kernel, together with user-provided arguments of file cmdline.txt. Consequently, in our setup, the firmware will call u-boot with those arguments. U-boot has to pass these arguments to the kernel, otherwise the kernel will fail to boot.

By the end of 2015, a patch to u-boot had been proposed, in order to pass these arguments. But it has never been integrated in mainline repository, and it is very outdated now. However, it pointed me in the right direction. Actually, the firmware passes those kernel arguments to the kernel (or u-boot in our case) by altering node /chosen of the device-tree. Thus, u-boot can retrieve them by reading this device-tree node.

U-boot provides two environment variables related to the device-tree:

  • fdt_addr: the address of the provided dtb (device-tree blob) in RAM.
  • fdt_addr_r: an address that can be used to store a user provided dtb. In a netboot scenario, you will probably download both the kernel and its compatible dtb using TFTP. You will store the downloaded kernel at kernel_addr_r and the downloaded dtb at fdt_addr_r, then call the boot command.

So, back to our issue: we can read the firmware-provided kernel arguments like this:

# tell u-boot to look at the given device-tree
fdt addr $fdt_addr
# read "/chosen" node, property "bootargs", and store in var "given_bootargs"
fdt get value given_bootargs /chosen bootargs

This is exactly what we do here, in the second-stage u-boot script. So now we have firmware-provided kernel arguments in variable given_bootargs.

But actually, we have to process them a little.

When file cmdline.txt is not provided or empty on the SD-card, the firmware will provide default kernel arguments:

  • 3 of these default arguments are suited for an OS installed on the SD-card: root=/dev/mmcblk0p1 rootfstype=ext4 rootwait. This is of course not compatible with a network boot.
  • 1 more argument kgdboc=<something> is a kernel debugging configuration parameter. This can cause the kernel boot to fail if the kernel is not compiled with appropriate support.

We can filter out those parameters by using u-boot regular expression features:

setenv bootargs ""
for arg in "${given_bootargs}"
do
    setexpr rootprefix sub "(root).*" "root" "${arg}"
    if test "$rootprefix" != "root"
    then
        setexpr kgdbprefix sub "(kgdboc).*" "kgdboc" "${arg}"
        if test "$kgdbprefix" != "kgdboc"
        then
            # OK, we can keep this bootarg given by the firmware
            setenv bootargs "${bootargs} ${arg}"
        fi
    fi
done

And we are done. We just have to append our custom parameters for network boot (root=/dev/nfs, nfsroot=..., etc.) and the kernel should boot correctly.

Raspberry Pi 3b+ native netboot

Raspberry Pi 3b+ model comes with a network boot procedure enabled by default. It is also possible to enable this bootup procedure on Raspberry Pi 3B model, but it is not enabled by default, and I did not test this activation procedure myself (yet). I just tested the Raspberry Pi 3b+ model.

The major plus of using this procedure is that such a node does not need a SD card anymore. And the SD card is the most frequent point of failure on Raspberry Pi boards.

Note that even if the raspberry pi foundation mentions “PXE booting”, the network boot procedure is not really compatible with a standard PXE setup. Actually, the Raspberry Pi board just tries to retrieve using TFTP the same files it usually finds on the SD card: bootcode.bin, start.elf, config.txt, cmdline.txt, dtb and overlay files, kernel or kernel7.img, etc.

ISC DHCPd setup

The tutorial written by the raspberry pi foundation is based on dnsmasq on server side. In WalT we use ISC DHCPd. We could however adapt it easily, just by adding the following code on top of our dhcpd.conf file:

class "rpi-pxe" {
  match if ((binary-to-ascii(16,8,":",substring(hardware,1,3)) = "b8:27:eb") and
            (option vendor-class-identifier = "PXEClient:Arch:00000:UNDI:002001"));
  option vendor-class-identifier "PXEClient";
  option vendor-encapsulated-options "Raspberry Pi Boot";
}

Actually, if the DHCP server does not respond with this vendor option set to value Raspberry Pi Boot, the Raspberry Pi board will consider its network boot procedure is not implemented on server-side and it will abort its network boot.

A major bug in DHCP handling

The board firmware has a major bug in the DHCP protocol handling.

A standard DHCP sequence can be summarized as follows:

1. DHCPDISCOVER rpi3b+  -> dhcpd    # Hi, could you allocate an IP for me?
2. DHCPOFFER    dhcpd   -> rpi3b+   # Well... what about 192.168.152.176?
3. DHCPREQUEST  rpi3b+  -> dhcpd    # OK, I take 192.168.152.176!
4. DHCPACQ      dhcpd   -> rpi3b+   # OK, noted!

The firmware on the raspberry pi 3B+ does not fully follows this procedure. When the board firmware receives message DHCPOFFER, it stops negociation at this time and immediately starts using the proposed IP (for TFTP transfers). Since the DHCP negociation is not complete, the DHCP server will not consider this IP is allocated, and, after a while, it may propose the same IP to another node, leading to major network issues.

The severity of this bug is mitigated by the fact another DHCP request is often sent by the kernel or the init system shortly after this one, if the system boots correctly. Thus, after a few seconds, an IP address should be properly associated to the node.

Regarding WalT, after a successful first boot, the problem disappears: when a new node is detected, its IP address is removed from the set of free IPs, and the DHCPd configuration is automatically rebuilt. The new configuration associates the node’s mac address to this IP, and this association remains forever. Because of this, we plan to boot our raspberry pi 3B+ nodes with u-boot on a SD-card, at least once. After this first boot, the node is known and has a dedicated IP, thus the native netboot should work and the SD-card can be removed. However we still have to validate the robustness of this approach in a wider setup, and see if we detect other issues with the firmware.

Using kexec

Since we had issues with early Raspberry Pi compatible versions of u-boot (2012), we tried other network bootloading techniques.

A simple two-steps network bootloading procedure could easily be setup:

  • The SD card would be populated with a minimalistic linux-based operating system.
  • After bootup, this minimalistic linux-based OS would download the target kernel and device tree (TFTP), then update config.txt on the SD-card to target these files, and reboot. (Still, this would require a way to restore config.txt for the next two-steps bootup.)

But this has a major drawback. Raspberry Pi are robust devices, but the SD card is quite fragile. With frequent writes, its lifetime will usually not exceed one or two years. (And if the mechanism you are trying to implement often writes the same sectors (e.g. the partition table), you may very well trash several SD-cards just in the debugging phase!)

As a result, in WalT, we keep the SD-card read-only. The whole bootup procedure is read-only, and once the final OS is started, it stores file modifications in RAM (through a filesystem union mechanism).

Still, in order to overcome issues with early u-boot versions, we implemented another mechanism, based on kexec. kexec is a feature of the linux kernel that allows it to load another kernel and switch to it without a hardware reboot. Using this technique, the simple two-steps network bootloading procedure described above can be adapted to avoid writes on the SD-card.

This technique was working good, up to model raspberry pi 2B (excluded). From raspberry pi 2B onward, CPUs are multicores. kexec can only work if only one core is running when it switches to the other kernel. If ever it was possible to stop the 3 other cores at this time, it should work. But apparently raspberry pi CPUs do not provide this CPU hotplug feature. As a result, unless you force boards to use only one core (and that would be a shame), there is apparently no way to make kexec work with those recent models.

Other options

U-boot is not very fun to use. In particular, you cannot provide simple text files as boot scripts: you have to provide u-boot scripts. An u-boot script is just a text file that has been compiled with tool mkimage (provided by package u-boot-tools in Debian and Ubuntu). mkimage adds a short binary header on top of the text file, with checksum and other information. If you open the u-boot script with your favorite text editor, you can read the textual content after the header, but if you modify it, u-boot will fail to load it again because of the wrong checksum.

For network booting a PC, there is another bootloader called ipxe, with amazing features. And grub can also be compiled with netboot features. Both of these are much easier and simpler to use, compared to u-boot.

Actually, given recent additions on these projects, one could imagine chainloading another bootloader after u-boot: u-boot can now provide an UEFI layer, and grub or ipxe both provide an ARM-UEFI version.

Debugging

Last tip: by default, serial line is not activated anymore on 3B and 3B+ models. If you want to use it, add enable_uart=1 in config.txt on the SD card. With an appropriate console=... kernel parameter passed from the firmware (see related subsection above), that should be enough to have bootup traces of the kernel displayed on serial line.

French readers may be interested in my last article published in GNU/Linux Magazine 197 (October 2016). It explains in details the main tricks I used when I wrote my IOCCC 2015 winning entry.

The source code

Thanks again to Tristan, Pierre, Henry, Timothy, Elodie and Colin. You helped me make the trickiest parts much easier to understand!

The source code of IOCCC 2015 winning entries have been published recently. My source code is here.

Quick start

You can compile prog.c using gcc -o prog prog.c and start playing with the resulting binary (I tested in on Ubuntu and FreeBSD).

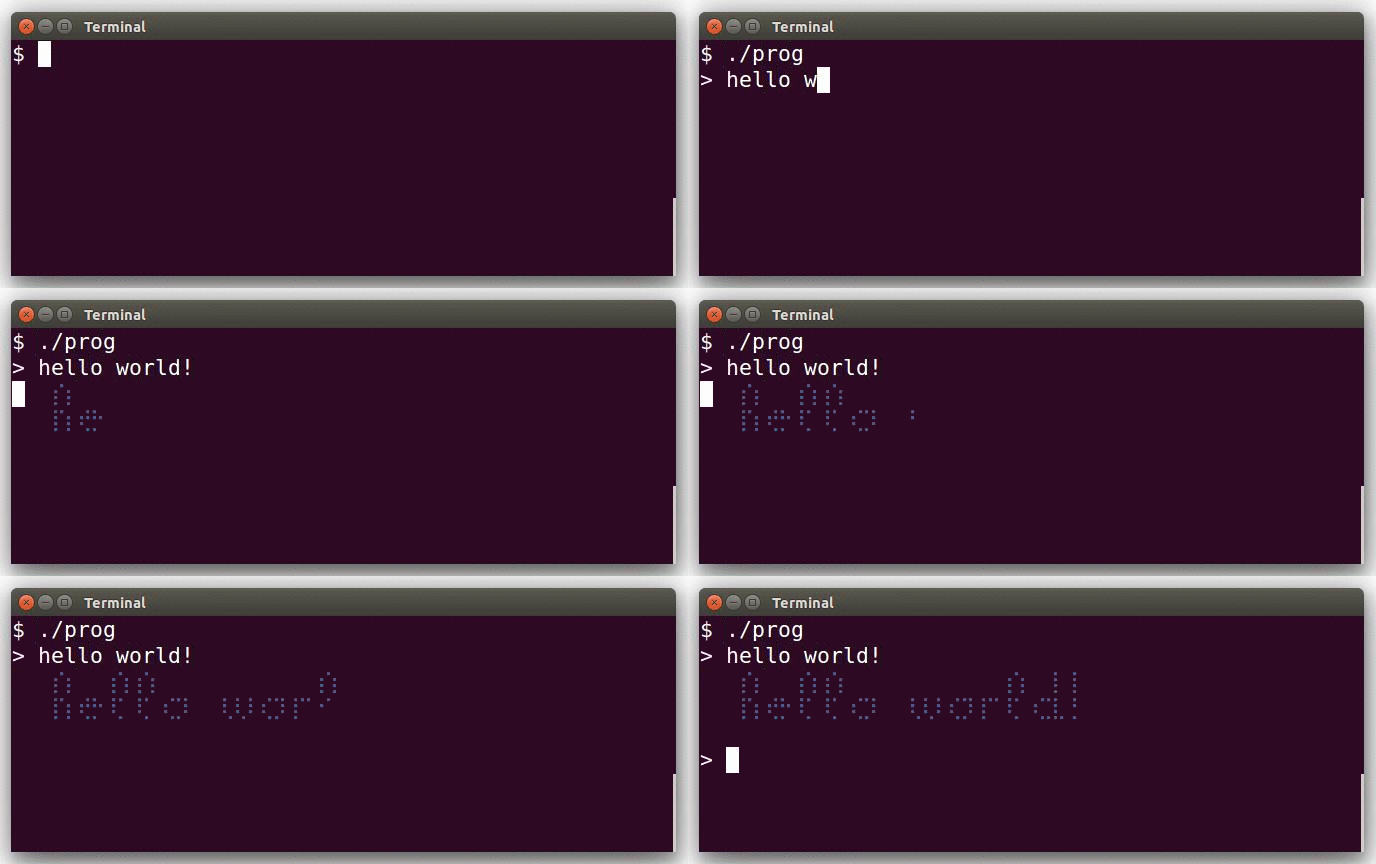
It looks like this:

Running ./prog

This actually demonstrates the interactive mode.

Alternatively, you may specify the input data (e.g. echo 'hello' | ./prog). In this case no prompt is displayed and the rendering starts immediately.

The program uses the braille patterns range of the unicode standard: this allows to consider each terminal character as a tiny 2x4 bitmap.

Obfuscation

The program is obfuscated in various ways. Let me explain the most unusual one.

At some point, the program swaps file descriptors 0 (usually stdin) and 1 (usually stdout). This is achieved using dup() and close() function calls. As a result, functions such as printf(), puts(), write(1, ...) will write to stdin instead of stdout. Depending on the way you start the program, writing to stdin may succeed or not:

  Command Line Stdin is… Writing to stdin will…
(A) $ ./prog current tty (same as stdout) succeed!
(B) $ ./prog < file.txt file.txt (opened read-only) fail.
(C) $ echo test | ./prog the pipe (opened read-only) fail.

In the code, the program always tries to print the 2 chars of the interactive prompt, using write(1,"> ",2). It succeeds in case (A) and fails silently in case (B) or (C).

This is how is handled the interactive vs non-interactive modes. The program actually always acts the same, but a complex side effect of the file descriptors swapping makes it behave differently depending on how you started it.

What’s next?

For more details about secret features or obfuscation aspects you can check out the hints file which compiles judges’ comments and my own explanations.

I also recommend looking at the other winning entries, some of the authors have been very imaginative!